One side note, from what I can tell, Houdini's (as of Houdini 10) integration or support for displacement from ZBrush is much nicer than that of some other programs. There's less fiddling around and fewer steps to screw up, which is a nice point in Houdini's favor.
First open up your detailed model in ZBrush:
 |
| From Learning 3D |
Switch down to subdivision level 1 if you're not already there.
We need to create a UV set. You could do this in some other program or even in Houdini, but this method seems to work fine too. Open up the Tool>Textures sub palette and click on GUVTiles. This will create a a UV set.
 |
| From Learning 3D |
Verify this by clicking on the CheckUV button - this will check UVs and if there are problem vertices, then they'll be highlighted in red. You'll get the resulting grey scale image in your current texture slot. You can turn this off if everything is OK.
 |
| From Learning 3D |
Now that UV's are in place we can export the tool. Click on the Tool>Export sub palette and make sure that only Obj, Qud (for Quads), and Txr are toggled. Leave the rest toggled off.
 |
| From Learning 3D |
In houdini create a new Geometry object, and add a File SOP. Import the newly exported obj file that saved out in ZBrush.
 |
| From Learning 3D |
Now back to ZBrush to setup and create our displacement map. Go to the Tool>Displacement sub palette and make sure that the Adaptive and SmoothUV buttons are toggled on. DPRes is the height/width of the resulting displacement map image, set that to whatever you want (I believe the usual suggestion of power-of-2 for sizes is still relevant).
 |
| From Learning 3D |
Go to the ZPlugin menu, and open up the MULTI DISPLACEMENT 3 sub palette. Click the Export Options buttons to bring up the settings dialog.
 |
| From Learning 3D |
The quick settings code is "DE-JCHK-EACADA-4D_D32". That's the top entry in the screenshot. Take a look at the actual settings this is affecting. Scale is set to "Auto", Smooth and Seamless are turned on, and, most importantly for Houdini, Vertical Flip is set to true. Accept the settings, and then create the map, by clicking on the Create All button in the ZPlugin > MULTI DISPLACEMENT 3 sub palette. This will start the process, and, depending on your model and computing power, may take a while. Once the files are saved you should end up with at least one tif file that has "4D_D32" in it's file name. This is the displacement map we'll be using in Houdini. Here's an example:
 |
| From Learning 3D |
Back in Houdini we need to bring in the displacement map. That's really easy, just go to the Material Palette and drag out a new Basic Displacement shader:
 |
| From Learning 3D |
Go back to the Geo node and we can see that we do have UVs in our imported geometry:
 |
| From Learning 3D |
Note the "uv" attribute that's now present. Add a Material SOP node and set the Material property to point to the newly added Basic Displacement shader that you just added.
 |
| From Learning 3D |
Open up the settings for the displacement shader and change the Overall Scale to "10", turn on Use Displacement Map, and set the Displacement Map path to point to your displacement map tif you created in ZBrush.
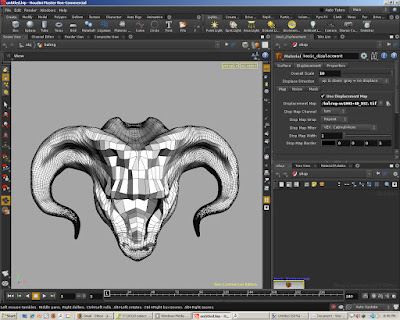 |
| From Learning 3D |
At the scene level, select your geo node and go to the Render tab, and in there select the Geometry tab. Toggle on Polygons as Subdivision (Mantra). Under the Render>Dicing tab you can also play with the Shading Quality values but I didn't find them to make a really big difference.
 |
| From Learning 3D |
At this point you should be able to render and get some great results. Here's a sample of what I was able to get. First the ZBrush renders
 |
| From Learning 3D |
 |
| From Learning 3D |
Next a Houdini render without the displacement map applied:
 |
| From Learning 3D |
Now with the displacement added:
 |
| From Learning 3D |
 |
| From Learning 3D |
Note that the geometry we have in Houdini is a lo res version of the model, in the example here that's a model with 100,000 vertices vs. over 6 million that were used in the final subdivision level in ZBrush!


